Socket System :: Guide & Information
General info
* You can create powerful additional options to the sockets items (more info: Click Here)
Sphere Information
* Drop map: Raklion (in Raklion - all monsters, Stadium - Raklion monsters in area "VIP Spots 2")
* Name: Sphere (Mono)
----- sphere level: 1
----- drop level: 91 - 95 level monsters
* Name: Sphere (Flawed)
----- sphere level: 2
----- drop level: 91 - 95 level monsters
* Name: Sphere (Nature)
----- sphere level: 3
----- drop level: 91 - 95 level monsters
* Name: Sphere (Flawless)
----- sphere level: 4
----- drop level: 101 - 102 level monsters
* Name: Sphere (Elite)
----- sphere level: 5
----- drop level: 128 - 134 level monsters
Seed Master
* NPC location: Elveland 46, 243 (Seed Master) & Noria (near bank)
* Option #1: Create Seed
* Option #2: Add Seed in Sphere

Seed Researcher
* NPC location: Elveland 50, 243 (Seed Researcher) & Noria (near bank)
* Option #1: Add Seed Sphere in Socket Items
* Option #2: Remove Seed Sphere from Item

STAGE #1 :: Seed Creation
* 1x Exc. Item +9+add (minimum)
* 1x Ancient Item +4~8 (minimum item level +4...maximum item level +8), +add is not required, but still can be used
--- if using Exc. Ancient item, then this item in Mix Box must be added after Exc. item (as 2nd item)
* 1x Jewel of Chaos* 1x Jewel of Creation
* 1x Jewel of Harmony
* Success combination = 90% success rate (Seed mix (%) chance for good seeds is 2x higher than bad seeds)
* Failed combination = items burned

Excellent Item+9+add
(minimum)
(minimum)

Ancient Item+4~8
(min lvl +4, max lvl +8)
(min lvl +4, max lvl +8)

1x

1x

1x

Seed
STAGE #2 :: Seed Sphere Creation
* Seed
* Empty Sphere (in most cases for best options use Empty Sphere level 5, why ? - see table down below)
* 1x Jewel of Chaos
* 1x Jewel of Creation
* Success combination = 100% success rate (Seed sphere)
* Failed combination = items burned

Seed

Empty Sphere

1x

1x

Seed Sphere
STAGE #3 :: Add Seed Sphere in Socket Item
* Socket Item
* Seed Sphere
* 1x Jewel of Chaos
* 1x Jewel of Creation
* Success combination = 100% success rate (Socket option added)
* If you want to recover Seed Sphere from Socket Item, talk to Seed Researcher and choose Option #2 "Seed sphere recovery"
----- it will give you item with empty socket slot and separate seed sphere
Seeds For Weapons
| Image | Type | Options | Sphere level 1 | Sphere level 2 | Sphere level 3 | Sphere level 4 | Sphere level 5 |
|---|---|---|---|---|---|---|---|
 |
Fire | (Level type) Attack/Wizardry increase | 20 | 19 | 18 | 17 | 14 |
| Attack speed increase | 10 | 15 | 20 | 25 | 30 | ||
| Maximum attack/Wizardry increase | 30 | 32 | 35 | 40 | 50 | ||
| Minimum attack/Wizardry increase | 20 | 22 | 25 | 30 | 35 | ||
| Attack/Wizardry increase | 20 | 22 | 25 | 30 | 35 | ||
| AG consumption decrease | 40% | 41% | 43% | 46% | 50% | ||
 |
Ice | Increases Life when monster is killed | 8 | 7 | 6 | 5 | 4 |
| Increases Mana when monster is killed | 8 | 7 | 6 | 5 | 4 | ||
| Skill damage increase (on any spell) | 37 | 40 | 45 | 50 | 60 | ||
| Attack rate increase | 25 | 27 | 30 | 35 | 40 | ||
| Item durability increase | 30% | 32% | 34% | 37% | 40% | ||
 |
Lightning | Excellent damage increase | 100 | 200 | 300 | 400 | 500 |
| Excellent damage rate increase | 11% | 12% | 13% | 14% | 15% | ||
| Critical damage increase | 300 | 320 | 350 | 400 | 500 | ||
| Critical damage rate increase | 6% | 7% | 8% | 9% | 10% |
Seeds For Armor (Set Items)
| Image | Type | Options | Sphere level 1 | Sphere level 2 | Sphere level 3 | Sphere level 4 | Sphere level 5 |
|---|---|---|---|---|---|---|---|
 |
Wind | Automatic Life recovery increase | 80 | 100 | 130 | 160 | 200 |
| Maximum HP increase | 1% | 2% | 3% | 4% | 5% | ||
| Maximum Mana increase | 1% | 2% | 3% | 4% | 5% | ||
| Automatic Mana recovery increase | 70 | 140 | 210 | 280 | 350 | ||
| Maximum AG increase | 250 | 300 | 350 | 400 | 500 | ||
| Automatic AG recovery increase | 10 | 15 | 20 | 30 | 40 | ||
 |
Water | Block rate increase (PvM) | 10% | 11% | 12% | 13% | 14% |
| Defense increase | 30 | 35 | 40 | 45 | 50 | ||
| Shield skill protection increase (Shield+skill) | 1% | 1% | 1% | 1% | 1% | ||
| Damage reduction | 2% | 3% | 4% | 5% | 6% | ||
| Damage reflection | 1% | 2% | 3% | 4% | 5% | ||
 |
Earth | Vitality increase | 100 | 200 | 300 | 400 | 500 |
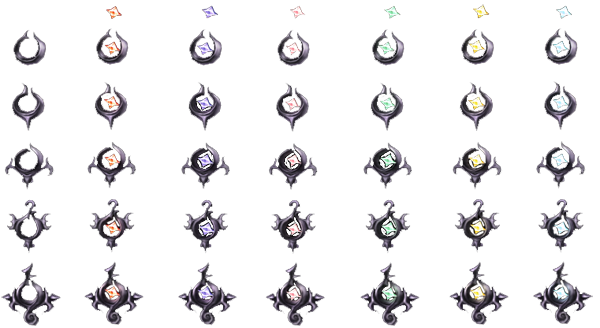
Seed Sphere Types
| Empty Sphere lvl 1 |
| Empty Sphere lvl 2 |
| Empty Sphere lvl 3 |
| Empty Sphere lvl 4 |
| Empty Sphere lvl 5 |

Bonus Socket System
IMPORTANT: By inserting 3 seed types in correct order (order info in table below) you randomly can get additional a Socket bonus.
* Socket slot 1
* Socket slot 2
* Socket slot 3
| Items | Socket (slot 1) | Socket (slot 2) | Socket (slot 3) | Options | Success rate |
|---|---|---|---|---|---|
| Swords, Axes, Maces, Bows, Crossbows, Scepters | Fire Sphere | Lightning Sphere | Ice Sphere | Attack power increase +50 | 100% |
| Lightning Sphere | Ice Sphere | Fire Sphere | Skill attack increase +50 | 100% | |
| Staffs, Sticks | Fire Sphere | Lightning Sphere | Ice Sphere | Attack/Wizardry increase +50 | 100% |
| Lightning Sphere | Ice Sphere | Fire Sphere | Skill attack increase +50 | 100% | |
| Helms, Armors, Pants, Gloves, Boots, Shields | Water Sphere | Earth Sphere | Wind Sphere | Defense increase +100 | 100% |
| Earth Sphere | Wind Sphere | Water Sphere | Maximum HP increase +500 | 100% |
Socket Set Option
IMPORTANT: Having the following seed types in your Socket items you can get the following additional (bonus) options.
| Items | Necessary Seed Spheres in Item | Options | Success rate | |||||
|---|---|---|---|---|---|---|---|---|
| Using all Seed Spheres | Fire Sphere | Water Sphere | Ice Sphere | Wind Sphere | Lightning Sphere | Earth Sphere | Double damage rate +3% | 100% |
| Fire Sphere | Water Sphere | Ice Sphere | Wind Sphere | Lightning Sphere | Earth Sphere | Ignore opponent defense by 1% | 100% | |